Didn’t Discover!!
What You're Looking For?
Didn’t Discover!!
What You're Looking For?
 By
Aman Bhati
By
Aman Bhati
Launching a new Squarespace website for your business is exciting, but it can feel intimidating if you are new to this platform.
You have spent hours selecting a beautiful template, adding relevant content, and customising the details, only to get confused with questions like “Did I miss anything?” or “What if my domain doesn’t work?”
The good news? Publishing is easier than it seems; with the right preparation, you can confidently put your site into the world.
To save you from this stress, here’s a clear guide on how to easily publish a Squarespace website. Read it till the end to get confidence to hit the publish button right away.
The simplest definition of Squarespace is: “Squarespace helps you design, craft, and launch websites without comprehensive coding skills.”
Besides its user-friendly, drag & drop interface, the platform is also popular for the Squarespace website templates; it is modern, customizable, and designed to look professional across all devices.
The primary reason behind choosing Squarespace is that it balances simplicity with flexibility. You can easily integrate third-party tools, eCommerce, payment gateways, or other functionalities you need and manage everything from one dashboard.
In short, Squarespace makes website building easy, but the crucial part of making it live still remains on us. Let’s explore how to do it.
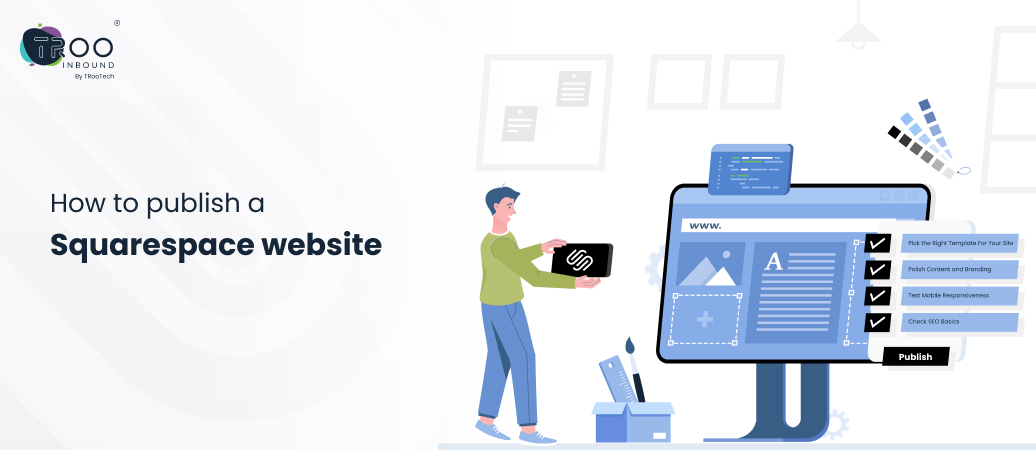
Publishing is the final step, but preparing your site for it is what needs your attention. Here’s what you should check first to make your site look professional and perform well before it’s live:
When you start building your site, you can choose suitable templates from the various Squarespace website templates available. Whatever you need to create, a blog, an eCommerce, or a portfolio, the template should align with your goals.
Proofread your content, upload high-quality images, and make sure your logo and brand colors are consistent. The “About” and “Contact” pages should be clear, as they are often the most visited.
Most visitors will land on your site from a phone. Use Squarespace’s preview tools to see how your site appears on smaller screens.
Before you publish, add meta titles and descriptions, create keyword-friendly URLs, and set alt text for images. These steps help your site get discovered faster in search engines.
Your domain name is the digital address people will use to find you. Without connecting a domain, your site will remain hidden behind a Squarespace trial URL. Here’s how you can connect your site and domain:
The easiest option. Your domain integrates seamlessly; you don’t have to deal with DNS settings.
If you own a domain, you must update DNS settings to point it to your Squarespace website. Squarespace provides step-by-step instructions for popular registrars like GoDaddy or Namecheap.
Always enable SSL for security and trustworthiness. This ensures your site runs on HTTPS rather than HTTP.
Publishing blindly can lead to embarrassing mistakes. Luckily, Squarespace has robust preview options.
Think of these steps as a rehearsal before the big show.
Now comes the part you were waiting for: publishing your Squarespace site! Here are simple steps on how to publish a site on Squarespace:
Get the SSL certificate: With an SSL certificate, your site will gain a padlock icon and HTTPS. This builds trust with visitors.
Verify whether the trial banner is removed: The “Squarespace trial” banner should disappear automatically once you upgrade to a paid plan.
And the final publish: Once you verify that everything on your site is perfect, go to Settings > Site Availability, and toggle the radio button from Private to Public. If you haven’t upgraded to paid plans, Squarespace will make you do that before you change your site availability settings.
Final step: Click on Save. Congrats! Your Squarespace site is now live!
Even with careful preparation, issues can arise. The most common problems include:
These hiccups may feel overwhelming for non-techies until they get experts involved. That’s why considering professional support can save time and frustration.
While DIY fixes might work for some, others may find the process stressful, especially when domains, DNS, SEO, and customizations are involved. This is where professionals come in. At TRooInbound, we specialize in making your site’s launch process stress-free.
Our skilled Squarespace developers ensure:
If you’d rather focus on your business than technical details, it’s worth exploring TRooInbound’s services. You can hire Squarespace developer from our team to handle everything from design tweaks to full-scale publishing. This decision can save you hours and publish your websites easily.
Publishing your site is just the beginning. Once your site is live:
> Track Performance: Use Squarespace analytics and Google Analytics.
> Optimise Content: Keep updating blogs, landing pages, and products.
> Run SEO Audits: Check rankings regularly and tweak as needed.
> Update Design: Refresh visuals occasionally to keep your site engaging.
Remember: a Squarespace website isn’t a “set it and forget it” project; it’s a live and growing asset for your business.
Publishing your site may seem like a big leap, but it’s completely manageable once you check out the steps. From choosing the right template to connecting your domain and fixing small issues, each step brings you closer to sharing your work with the world.
In addition to that, don’t forget that publishing a site is just the start of your online journey. The real growth comes from maintaining, optimizing, and evolving your website over time.
And if you’d rather not deal with the stress of trial and error, TRooInbound is here to help. With our expertise, your site can go live smoothly and generate results immediately.
Here you'll find the answers to all of your questions.
Squarespace lets you build and preview your site on a free trial (14 days), but you can’t publish it on your own domain without upgrading to a paid plan. During trial, you can only share a temporary Squarespace link.
Publishing requires a paid subscription. Plans start at around $16/month (Personal) and go higher depending on features like business, e-commerce, or advanced integrations.
Before publishing, share the preview or trial link with others for feedback. Once published, you can share your custom domain (e.g., yoursite.com) with anyone.
Your site typically goes live within minutes once you choose a plan and connect a domain. Sometimes, it may take a few hours if DNS or SSL is still updating.
Domains bought directly from Squarespace usually activate almost instantly. Third-party domains may take up to 24–48 hours to fully propagate on the internet.
Dive into other interesting, well-researched, and nicely structured blog posts
 a cta
a ctaWe will strategize our execution based on your requirement
Stay up to date by subscribing to our newsletter.
5900 Balcones Drive STE 100, Austin, TX 78731
Velocity 904-910, L.P. Savani Road, Nr. Madhuvan Circle, Surat, Gujarat 395009
5900 Balcones Drive STE 100, Austin, TX 78731

Call
+91 27174 54342

Email Address
hello@trooinbound.com

Skype Id
nikhil.jani

Schedule A Meeting
meeting/nikhil-jani
Copyright © 2026, TRooInbound. All Rights Reserved.